Deploy Node.js Apps with Confidence: Complete Deployment Guide
.webp)
Deploying a Node.js application on the cloud can be a time-consuming task—especially when you factor in configuring infrastructure, setting up CI/CD pipelines, and managing deployments. Microtica simplifies that process. With a ready-made Node.js template, developers can deploy a production-ready application in just a few minutes.
Microtica works with any cloud provider that supports Kubernetes, including AWS, GCP, Azure, or on-premises clusters. While this guide shows AWS as an example, Microtica is a full DevOps automation platform that helps you deploy, manage, and optimise applications across multiple clouds efficiently.

Prerequisites for Node.js AWS Deployment
Before deploying a Node.js application to the cloud, ensure you have the right requisites in place. You will need:
- Node.js Application: A working Node.js project with a package.json file and an entry point.
- A Cloud Account: For this example, an AWS account with access to services like EKS, EC2, or S3.
- IAM Permissions: Make sure your cloud user has the necessary permissions to create and manage resources.
- CLI Installation: Install the AWS Command Line Interface (CLI) or relevant CLI tools if using other clouds.
- Basic Terminal Knowledge: You should be comfortable using the terminal to run commands, navigate directories, and install packages.
Proper preparation helps avoid common setup issues and streamlines the overall deployment process for a smooth and secure application launch.
How to Deploy a Node.js App on AWS Step by Step
Deploying a Node.js app requires carefully following each step in the process. Below is a general guide, using AWS as an example, but similar steps apply when deploying to GCP, or Azure connected to Microtica.
1. Select the Node.js Template
In the starting screen, select the Node.js template, in the Free Application Templates section. These are free forever templates. You will be redirected to a page where you need to connect your Git account, choose a cluster where to deploy your app, and Deploy.
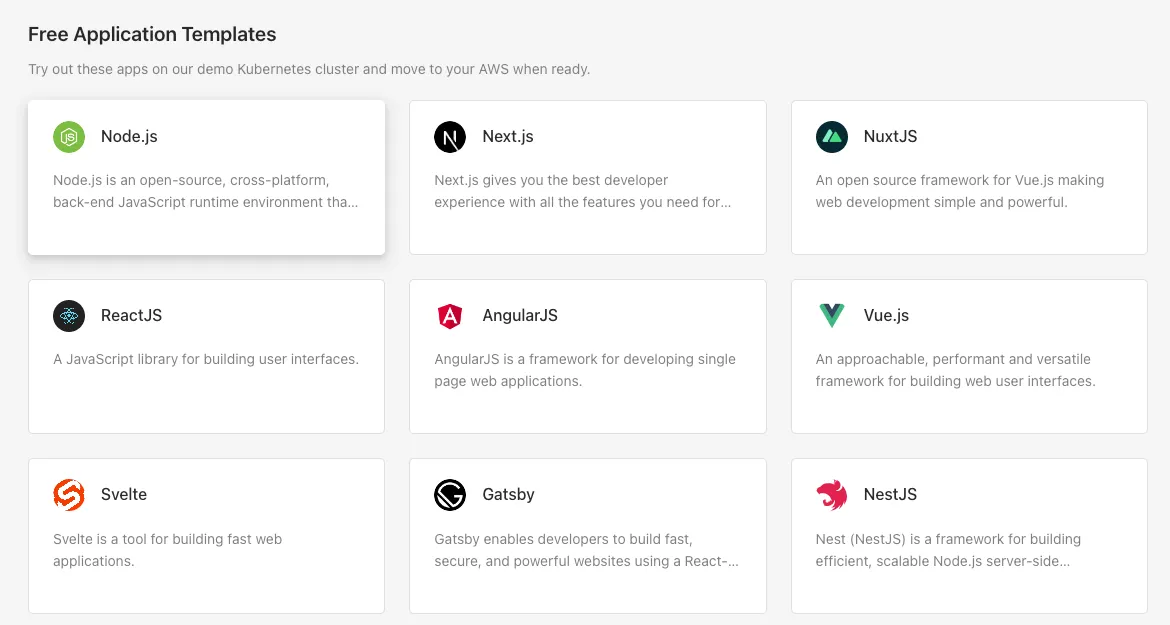
On the left side, you can see a link to the source code of this template. It will redirect you to Microtica's GitHub account.
2. Import Git Repository
As a first step, you need to connect a Git account (GitHub, Bitbucket, or GitLab). If you already have a Git account connected to Microtica, you can choose it from the list. Select the repository with your existing application code, click Save, and every Git push will be deployed automatically in Microtica.

3. Prepare Your Git Repository
When importing an existing project in Microtica, there are necessary files that need to be present in the repository, in order for the CI/CD pipelines to work correctly. These files are defined in the .microtica folder, whose content you can preview on our GitHub account.
Clicking the Add button will create a new .microtica folder in your Node.js repository that contains (among other files) the microtica.yaml pipeline spec and a Dockerfile. The files contain some default configurations, so if you have anything specific for your application, you can update them.
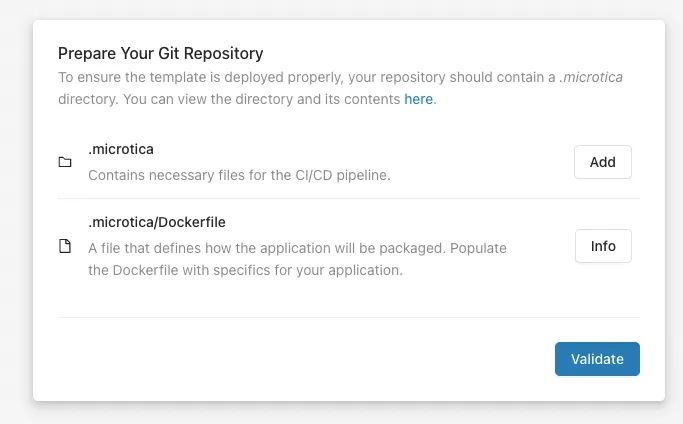
Before continuing to the next step, we need to verify that these files are present in the repository. Clicking the Validate button will perform a check, and you can continue to choose where to deploy your application, once everything is correctly setup in your Git repo.
4. Select a Cluster
The next step is choosing the Kubernetes cluster where your application will deploy. There are two options you can select to run your container app:
- Create a new EKS cluster on the spot
- Connect an existing cluster
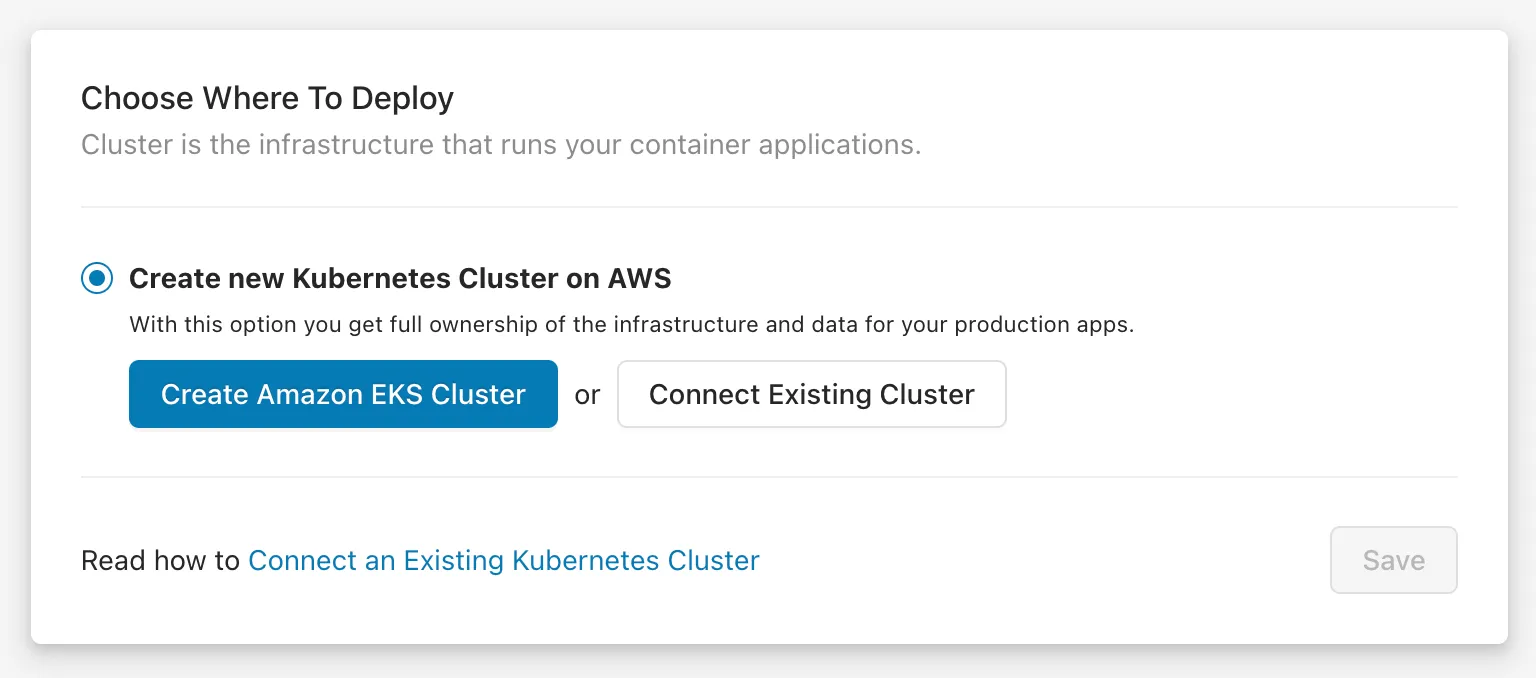
5. Create a New EKS Cluster on the Spot
If you want to deploy your Node.js application on your own AWS account, you can create an AWS managed-Kubernetes (EKS) cluster, by clicking on the Create Amazon EKS Cluster button.
This is the recommended option for production applications, as it gives you full ownership of your cloud infrastructure and applications.
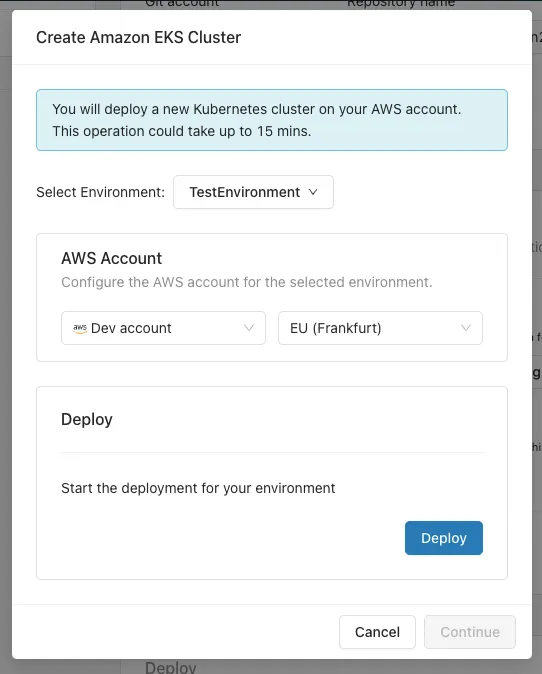
This action will open the popup shown on the image above. You can select the environment in which you'd want this cluster to be deployed. If you don't have an existing environment, you can create one by selecting the Create Environment action from the dropdown menu.
Once you select an environment, the next step is to select an AWS account and region where the EKS cluster will be deployed. If you don't have a connected AWS account, you can connect one right here by clicking the Connect AWS Account button. This will initiate a CloudFormation stack that will give Microtica permissions to provision infrastructure on your AWS account. Once you create the stack, the connection will be established automatically and you'll be able to see the AWS account in the dropdown list of accounts.
Select the account, select a region, and then click on Deploy to start the deployment of your environment.
Deploying a new Kubernetes cluster on your AWS account could take up to 15 mins.
6. Connect an Existing Cluster
In Microtica, you can also connect an existing Kubernetes cluster that you have and deploy your applications there. You can connect Kubernetes clusters running on any cloud provider or on-premises. By connecting a cluster, you can use the full capabilities of Microtica’s Kubernetes automation, including its cost optimisation tools, AI Infrastructure Builder, and integrated monitoring features.

Important note: While Microtica provides built-in provisioning automation for AWS EKS, deploying to GCP and Azure requires connecting an existing Kubernetes cluster via kubeconfig for GCP (GKE) and Azure (AKS). Currently, Microtica does not automate the creation of GCP or Azure clusters in the same streamlined way as AWS EKS provisioning.
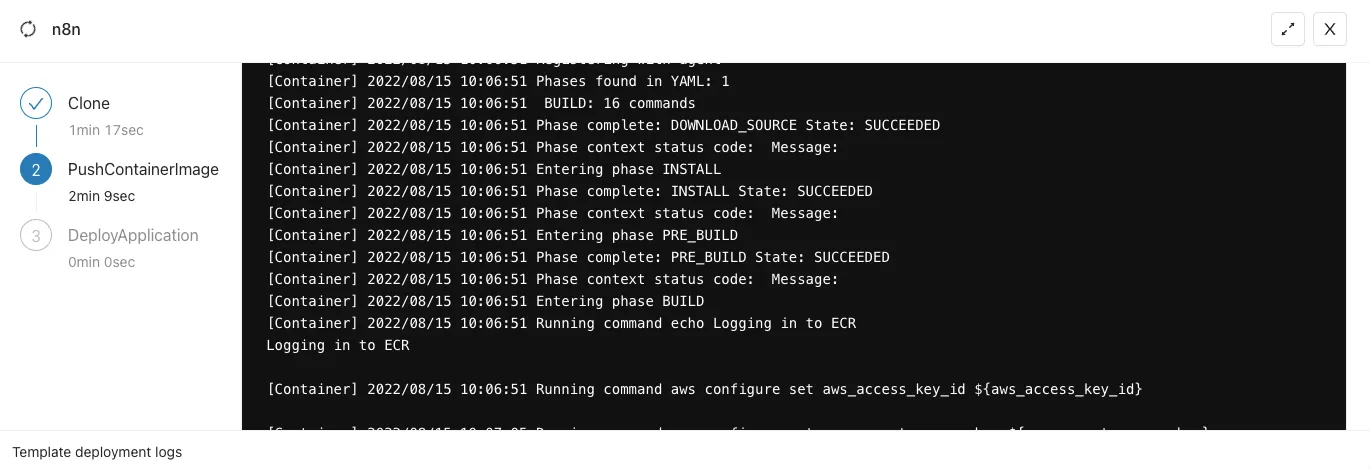
7. Deploy Node on AWS
Once you’re done with the cluster selection, you can go ahead and trigger a deployment of the environment by clicking on the Deploy button.
It takes approximately 4-5 minutes for this application to be deployed on the cloud. In the meantime, you can follow the detailed deployment logs by clicking the View Logs button.
8. Access Application
When the deployment is finished, you will see a View Applications button, that leads you to the Apps tab inside the environment. Here you can see all your live applications that are deployed and currently running on the cloud.
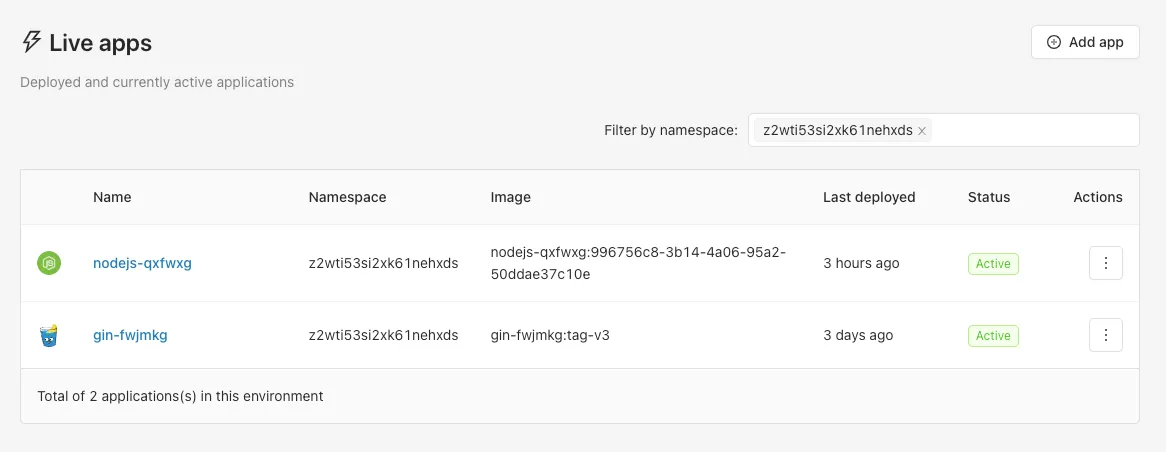
Select your Node.js application to navigate to the overview page, where you have some basic information about the app. By clicking on the domain field or the Visit button, you can preview your application live in the browser.
For even more information, you can also look at the Deployments and Monitoring tabs, where you have the pipeline history, resource consumption metrics, and logs for your instances.
Microtica As The Right Choice for Deploying Node.js on AWS
Microtica provides a streamlined way to deploy Node.js applications by automating the entire infrastructure and deployment process. It eliminates the complex parts of manual setup and configuration with integrated CI/CD pipelines, saving time and reducing the possibility of mistakes.
Beyond deployment, Microtica offers:
- Cost optimisation features to monitor and control cloud spend
- AI Infrastructure Builder to design production-grade infrastructure automatically
- Built-in monitoring and scaling features for stable and efficient operations across clouds
Teams without experienced DevOps resources will find it especially helpful because it manages environment setup, scaling, and provisioning out of the box. This keeps developers focused on building their apps while ensuring a reliable and optimised cloud operation.
Conclusion
Deploying a Node.js application on the cloud can be challenging, particularly when handling infrastructure, environments, and deployment pipelines manually. Microtica streamlines this process with automation, reusable components, integrated CI/CD, and additional features like cost optimisation and AI-powered infrastructure building. With the right tools and preparation, you can automate deployments, reduce setup time, and ensure a smooth, scalable launch on AWS, GCP, Azure, or your on-premises Kubernetes cluster.
Frequently Asked Questions
How do you deploy your Node.js application?
You can deploy your Node.js application using containerisation (e.g. Docker), Kubernetes clusters, and CI/CD pipelines to automate the process. Tools like Microtica simplify this by providing ready-made templates and full DevOps automation capabilities.
Where can I host a Node.js app?
Node.js apps can be hosted on various platforms, including AWS, GCP, Azure, DigitalOcean, or any server with Node installed. Using Kubernetes with Microtica gives you cloud-agnostic flexibility and scalability.
How to launch a Node.js application?
To launch a Node.js app, build your project, containerise it if needed, deploy it to a server or Kubernetes cluster, and expose it via a domain. Microtica automates these steps with integrated CI/CD pipelines and infrastructure management.

Relevant Posts