How to Deploy a Next.js App on AWS: A Step-by-Step Guide
.webp)
Next.js has become a go-to choice for developers building modern web applications, thanks to its hybrid static and server rendering capabilities, built-in TypeScript support, and performance-focused features like smart bundling and route pre-fetching. It’s built on React but optimized for production, making it a solid framework for delivering scalable, fast, and SEO-friendly websites.
With a ready-to-use Next.js deployment template, you can self-host your app in your own AWS account — no DevOps expertise required. The process is fully automated, customizable, and ideal for getting a production-ready solution up and running in minutes. If you're looking to deploy a Next.js application on AWS without spending hours on infrastructure setup, Microtica offers a straightforward solution.
In this guide, we’ll walk you through each step on how to deploy Next.js app, from creating a Microtica account to accessing your live app by using Microtica’s one-click deployment feature. Whether you’re deploying on a shared Kubernetes cluster or spinning up your own EKS cluster, the setup is streamlined to help you focus more on your app, and less on the infrastructure.
One-click Deploy
Deploying your Next.js application doesn’t have to be complicated. Microtica simplifies the entire process with a one-click deployment option. By clicking the "Deploy with Microtica" button below, you can kick off an automated setup that takes care of everything from source code configuration to Kubernetes deployment.
This streamlined setup is ideal for developers who want to focus on building their app, not maintaining infrastructure. You’ll also gain access to deployment logs, performance metrics, and monitoring tools right from the Microtica dashboard.

How to Deploy a Next.js App to AWS Using Microtica
To deploy a Next.js app to AWS using Microtica, follow this simple, step-by-step guide. Microtica offers an easy, streamlined process to deploy your application on your own AWS infrastructure, with a focus on automation and seamless integration with Git repositories. Let’s dive into how to get your Next.js application live on AWS quickly and efficiently.
1. Create an account
To begin the process of deploying your Next.js application, you'll need to create a Microtica account. Signing up is completely free and can be done using your email address or one of your Git accounts, such as GitHub, GitLab, Bitbucket.
If you're looking for guidance on how to deploy a Next.js app, this step is where everything starts. Microtica is designed to integrate with your Git provider, making it easy to connect your codebase and automate deployments. Once your account is set up and connected, you'll be able to select deployment templates and access tools that streamline the process from development to production.
With your account ready, you're one step closer to deploying your Next.js app on your own AWS infrastructure.
2. Select the Next.js template
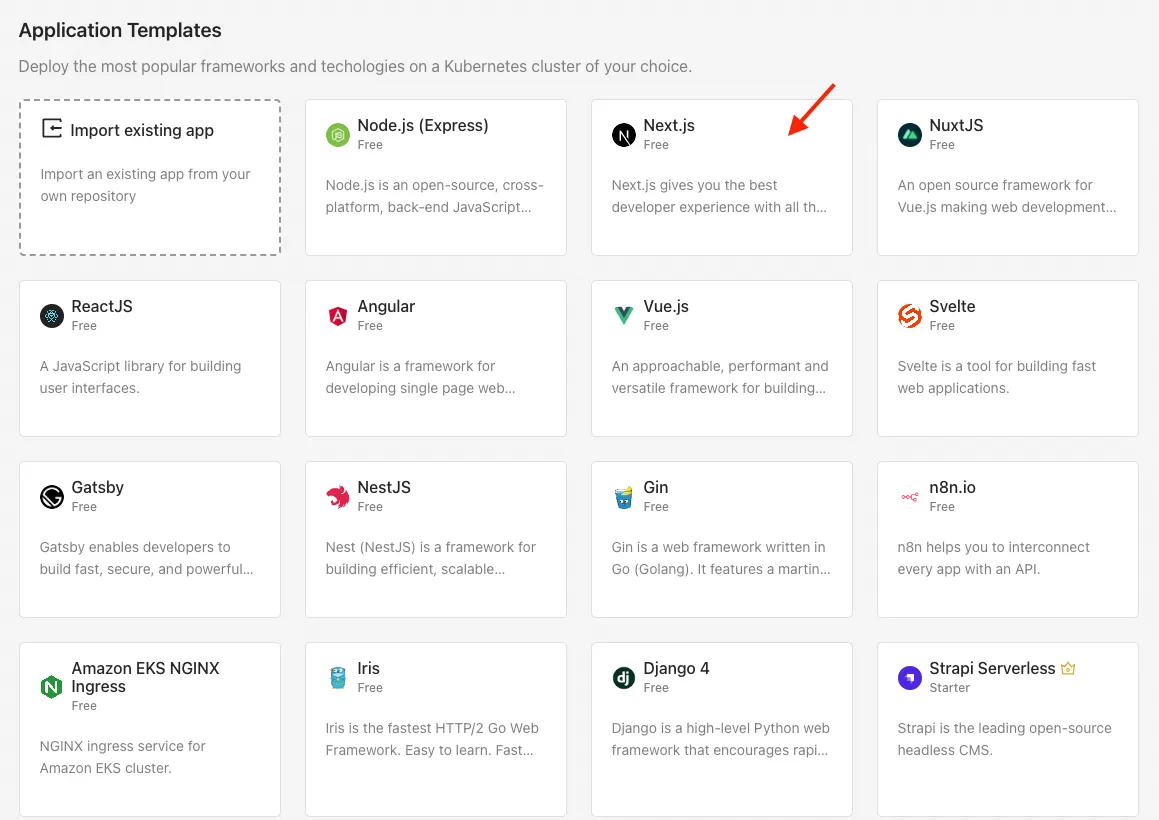
On the left side of the Microtica interface, you'll find a link to the source code associated with this deployment template. Clicking on it will take you directly to the corresponding repository on Microtica's official GitHub account, where you can explore the code, review the structure of the project, and even fork or clone it if you want to make custom changes before deployment. This gives you full visibility into what’s being deployed and allows for more flexibility if you need to tailor the application to your specific requirements.
3. Create Git Repository
The first step is connecting a Git account, such as GitHub, Bitbucket, GitLab, or AWS CodeCommit. Microtica will automatically suggest a default repository name based on the selected template, though you’re free to customize it. If you’ve previously connected a Git account to Microtica, you can simply select it from the list. Once the repository is created in your account, any future Git push to that repo will trigger an automatic deployment through Microtica.
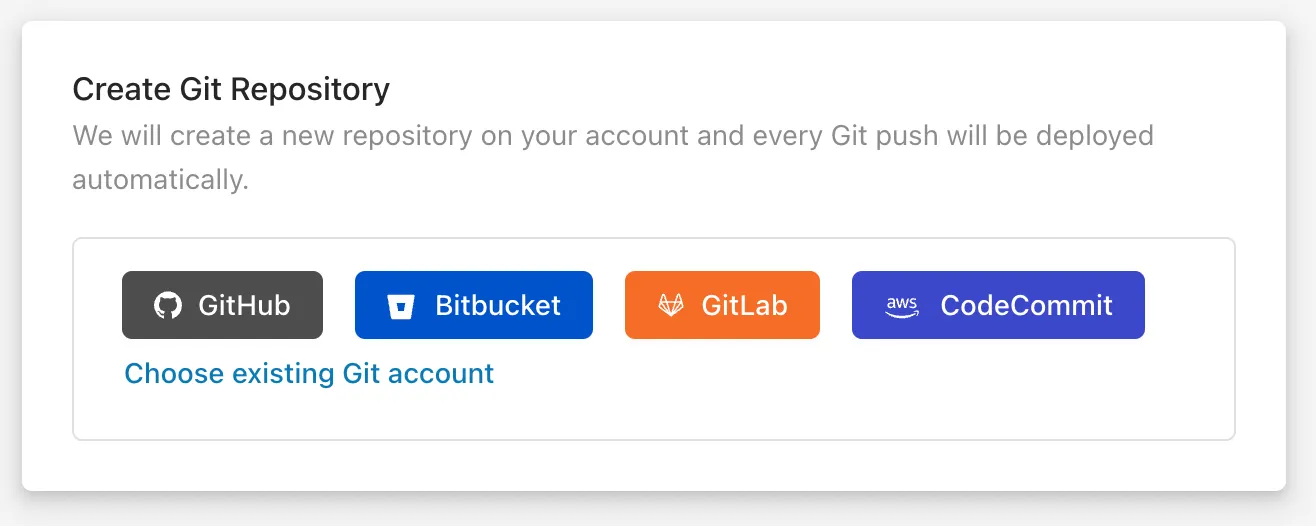
If you already have a Node.js application source code, then you should import your existing application in Microtica.
4. Configure Template
After creating your repository, you need to enter a name for the application, to be able to distinguish it from other apps in the Applications tab.
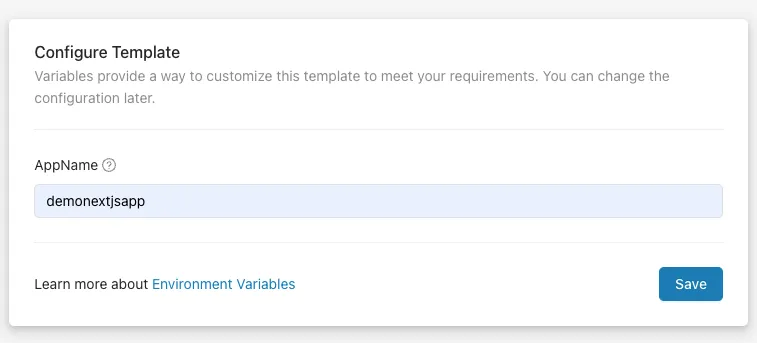
You can customize this template to meet your requirements with environment variables. You can update the configuration later in App Settings.
5. Select a cluster
The next step is choosing the Kubernetes cluster where your application will deploy. There are two options you can select to run your container app:
- Create a new EKS cluster on the spot
- Connect an existing cluster
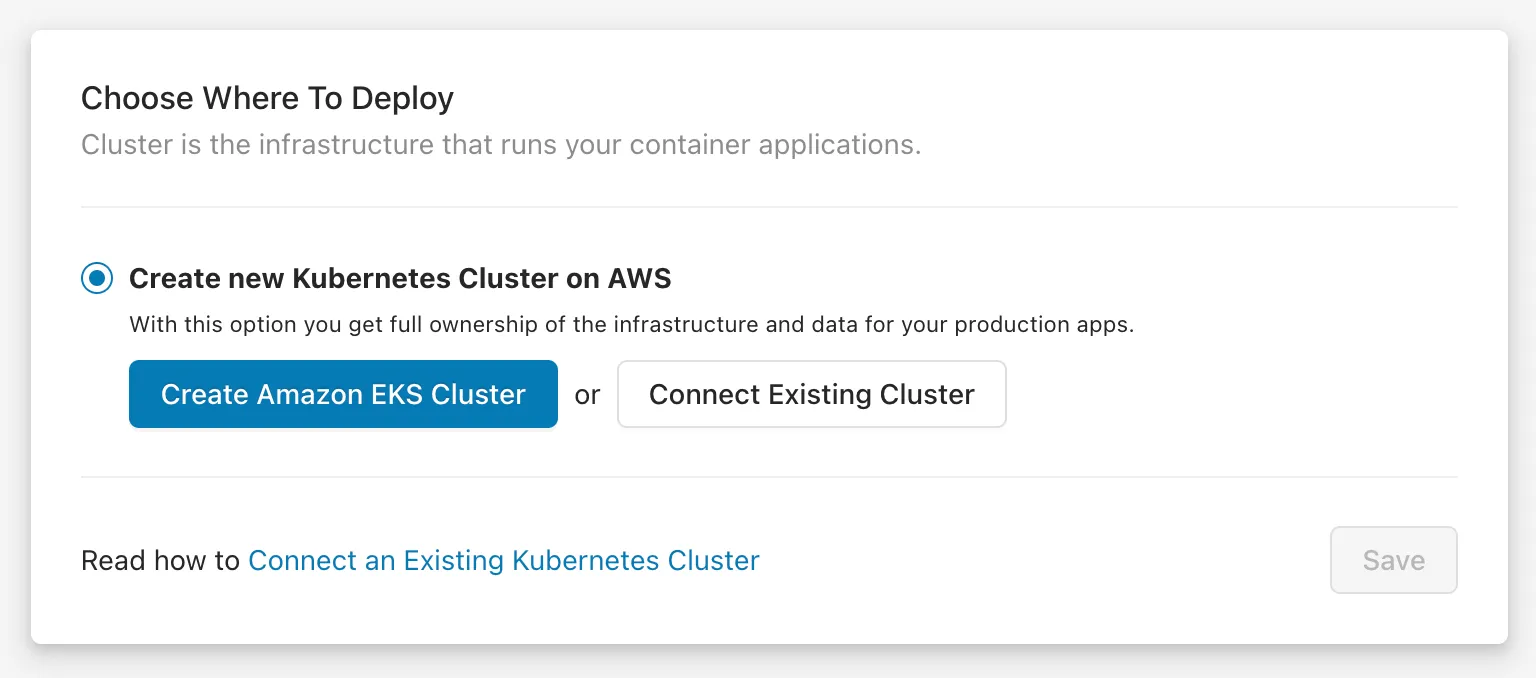
This step determines where your application will run, so choose the option that best fits your project’s scale, control needs, and existing infrastructure.
6. Create a new EKS cluster on the spot
If you want to deploy your Next.js application on your own AWS account, you can create an AWS managed-Kubernetes (EKS) cluster, by clicking on the Create Amazon EKS Cluster button.
This is the recommended option for production applications, as it gives you full ownership of your cloud infrastructure and applications.
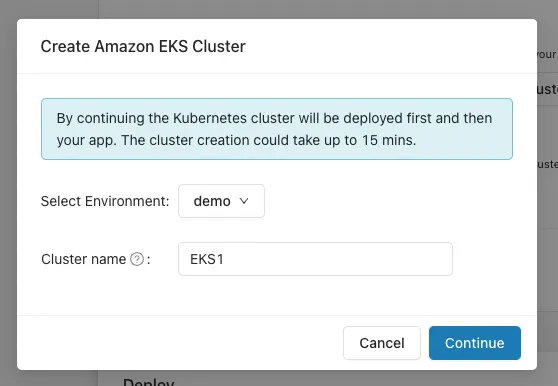
This will open a popup where you can choose the environment for your cluster. If you don't have one, select "Create Environment" from the dropdown. After that, choose your AWS account and region for the EKS cluster. If you haven't connected an AWS account, click "Connect AWS Account" to set it up. This will create a CloudFormation stack and give Microtica permission to manage your AWS infrastructure. Once connected, your AWS account will appear in the list. Select it, choose a region, and click "Continue" to proceed. Deploying the cluster may take up to 15 minutes.
7. Connect an existing cluster
In Microtica you can also connect an existing Kubernetes Cluster that you have and deploy your applications there. You can connect Kubernetes clusters running on basically any cloud provider or on-premise. By connecting a cluster you can use the full capabilities of Microtica’s Kubernetes automation.
8. Deploy the template to your cluster
Once you’re done with the cluster selection, you will see a summary of all the previous steps and what will be deployed with this template.

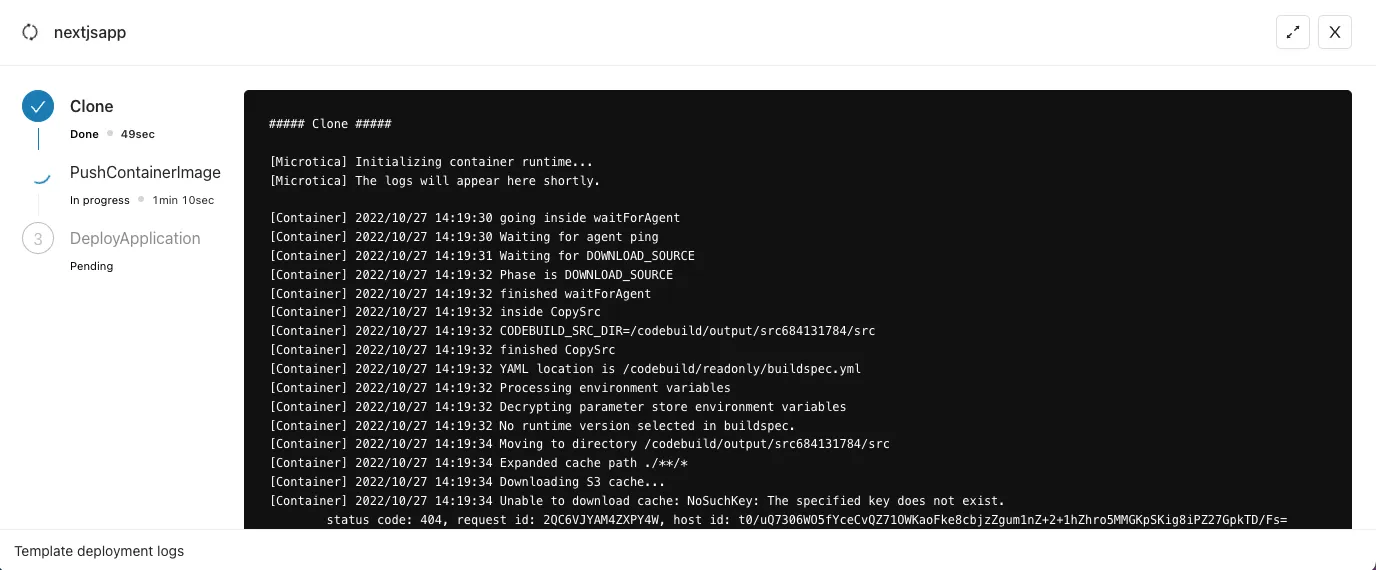
Click the "Deploy" button to trigger the environment deployment. The process typically takes 4-5 minutes (15-20 minutes with EKS). During this time, you can monitor the deployment progress by clicking the "View Deployment" button, especially if you're deploying an EKS cluster on your AWS account.

When the EKS cluster deployment is finished, or if you're deploying on our Shared Kubernetes cluster, click the View logs button to follow the application deployment.
7. Access the application
When the deployment is finished, you will see a View Application button, that leads you to the app Overview tab.

If you deployed on our Shared Kubernetes Cluster, your app will be accessible via a predefined domain provided by Microtica. You can preview your app live in the browser by clicking on the domain link or the "Open app" button. Additionally, you can check the Deployments and Monitoring tabs for pipeline history, resource usage metrics, and logs for your instances.
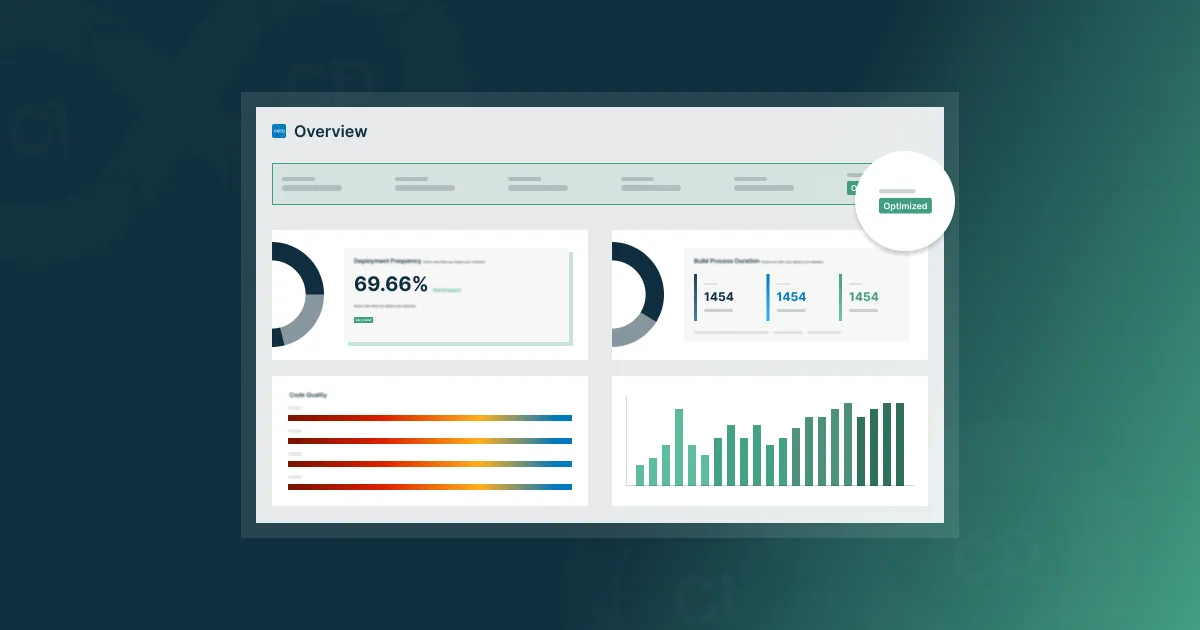
Monitoring the Deployed Next.js Application
Once you've learned how to deploy your Next.js app, the next important step is monitoring its health and performance. Effective monitoring ensures that any issues are caught early and resolved before they affect user experience. Here's how you can monitor your Next.js app:
Accessing Logs
Logs are important for diagnosing issues in your app after deployment. Microtica allows you to access logs directly from its interface, so you can quickly pinpoint any errors or performance issues. For more detailed logging, AWS CloudWatch offers a centralized platform where you can filter logs based on specific criteria. This can help you identify issues like slow performance or unhandled errors.
Setting up Alerts
Setting up alerts is a proactive way to monitor your app’s health. You can configure alerts in Microtica to notify you if the app crashes, CPU usage spikes, or a service becomes unresponsive. Alerts allow you to take immediate action before an issue escalates and impacts users. This feature is especially important once you know how to deploy a Next.js app and are running it in production.
Monitoring Tools Integration
For teams looking to integrate more advanced monitoring solutions, real-time metrics collection and custom dashboard visualizations are essential for tracking performance. An all-in-one monitoring solution can also provide comprehensive insights into your environment. These tools can be easily integrated into your deployment for enhanced performance tracking and better resource management.
Security Best Practices You Shouldn’t Skip
When learning how to deploy a Next.js app to AWS, security should always be a top priority. A secure app is less likely to experience breaches and ensures that user data remains protected. Here are some security measures to implement:
Environment Variable Management
For sensitive information like API keys and credentials, never hardcode them in your codebase. Microtica supports secure integration with AWS Secrets Manager, which helps you store and access environment variables securely. By using a secrets manager, you can avoid exposing sensitive data and ensure a more secure deployment.
HTTPS Configuration
To protect your data in transit, you should configure HTTPS for your deployed Next.js app. AWS Certificate Manager (ACM) allows you to easily provision SSL/TLS certificates and link them to your app. Enforcing HTTPS will make sure that all communication between your app and users is securely encrypted, which is a key part of the security process after deploying a Next.js app.
IAM Role Setup
When deploying your app, it’s important to assign IAM (Identity and Access Management) roles with minimal permissions to reduce security risks. Microtica allows you to configure IAM roles to make sure that your app services have only the necessary access to resources. This practice helps protect your application from unauthorized access or unintended changes.
Performance Optimization Tips for Production Readiness
After learning how to deploy a Next.js app, the next step is to make sure it's optimized for performance. Here’s how you can keep your app fast and responsive in production:
Enable Caching
Caching static assets like images, JavaScript, and CSS files is key to improving load times. By using AWS CloudFront or S3, you can cache these assets at edge locations near your users, reducing latency. Additionally, for dynamic content, consider server-side caching or caching at the API level to enhance performance.
Auto-scaling Configurations
To manage varying traffic levels, configure Horizontal Pod Autoscaling (HPA) in your EKS cluster. This feature automatically adjusts the number of pods based on demand, making sure your app can scale up or down depending on traffic. This is especially useful once you’ve successfully deployed your Next.js app and are expecting fluctuating user traffic.
Cold Start Minimization
For serverless functions like API routes in Next.js, cold starts can cause delays. To reduce these delays, consider using AWS Fargate or keeping serverless functions warm by provisioning concurrency. These methods help minimize the time it takes for a function to start after being idle, while your app maintains quick response times.
By following these steps, you'll be well on your way to maintaining a secure, fast, and scalable Next.js app deployed on AWS.
Conclusion
Deploying a Next.js application on AWS is made simple and efficient with the help of Microtica’s one-click deployment feature. Whether you're a seasoned developer or just getting started, Microtica streamlines the entire process, from setting up your repository to deploying your app on AWS, with no DevOps expertise required. By following the step-by-step guide and incorporating best practices for security, performance, and monitoring, you can ensure your Next.js app runs smoothly and securely in production.
The ability to easily scale and optimize your application, combined with robust monitoring tools, makes Microtica an ideal solution for getting your app live on AWS quickly. With Microtica, your focus can remain on building great features rather than managing infrastructure, allowing you to fully leverage the power of Next.js for scalable, fast websites.

Relevant Posts